
*This guide is intended for instructors using LMS course shells that have been prepared by an admin, or by instructors who have already inserted Medical Language Lab class links themselves. If an admin has not inserted MLL class links into your LMS course shell, or if you haven't been provided a copy of an LMS course shell with inserted MLL class links, please contact [email protected] for further assistance.
1. Before you begin
If an admin has set up your integrated Medical Language Lab class and inserted a class link into your LMS course, do not log into the MLL website and create a MLL class manually, because doing so will create a second MLL class that will not be integrated with your LMS course.
Though your integrated MLL class has already been created, there are class settings you may still need to finalize prior to the start of your semester. To begin, log into your Learning Management System (Blackboard, Canvas, Moodle, or D2L/Brightspace) and access your course.
2. Locate an MLL class link
Once logged into your LMS course, locate a link to your integrated MLL class.
The locations and titles of MLL class links will vary depending on how your admin has designed your course. Look for names like "Medical Language Lab," or the title of your assigned textbook. Ask your admin for help if you're unable to find your MLL class links.
Though the example below is of an MLL class link within a Canvas course, your MLL class links will appear similarly in all Learning Management Systems:

3. Launch an MLL class link
Click the link in your LMS course to launch an MLL class. Depending on your LMS, the MLL class link may load automatically in a new browser window, or you may be taken to a launch page with a button to load the class.
If you are taken to an MLL class link launch page, you may see an assignment description entered by an admin. If you don't see an assignment description, you can add one later on the assignment's setting page in your LMS. Click the button that reads "Load (link title) in a new window," so your class link will launch in a new tab.
If you click an MLL class link and it fails to launch, it's possible your web browser settings blocked the class' launch page. Check your browser settings to make sure pop-ups are permitted.

After launching an MLL class link, you'll be taken to the Classes page for your associated textbook.
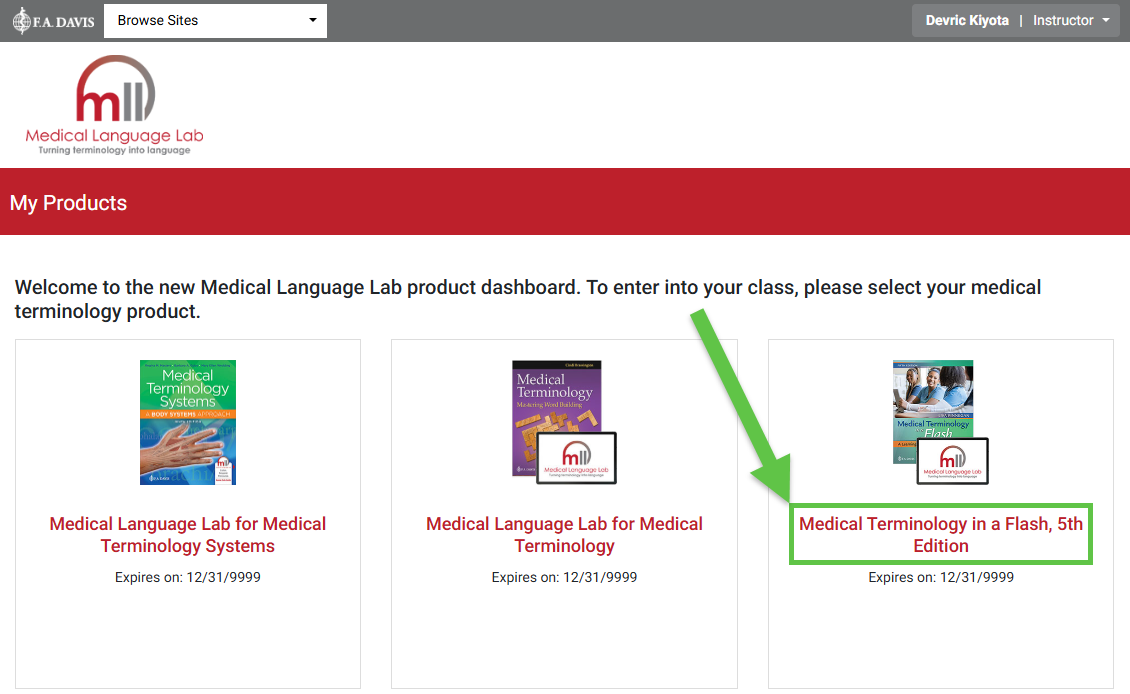
Alternatively, if your FADavis.com account has access to multiple MLL titles and/or MLL classes, launching an MLL class link will first take you to your Medical Language Lab My Products page, wherein you'll see listings for all the MLL titles you've got access to.
On your Medical Language Lab My Products page, click the title of your textbook to access its Classes page.
If your MLL class link launches successfully (to either your Medical Language Lab My Products or Classes page), that means your integrated MLL class link is functional. Your students will now be able to use a class link in your LMS course to automatically enroll in this integrated MLL class and access their assigned coursework.
Please stress to your students that they can always access their MLL class and assignments by launching the links in your LMS course.
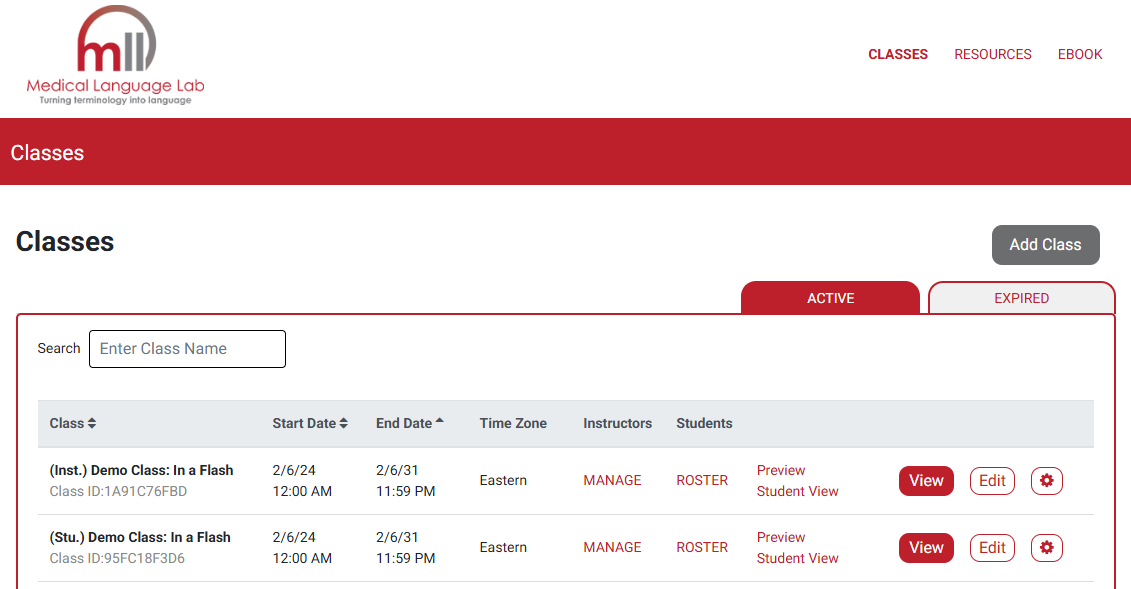
4. Navigate to your MLL Class Set-up
If your admin wants you to finalize your MLL class settings and set due dates within MLL, first launch and/or navigate to your MLL Classes page.
Your MLL Classes page collects your current and expired MLL classes. You may see a duplicate listing directly below your integrated MLL class, but you can disregard this as a normal part of the integration display. Please only make changes to the class atop its duplicate.
You won't need to copy your Class ID, because students will be automatically enrolled in your MLL class when they launch a class link via your LMS course.

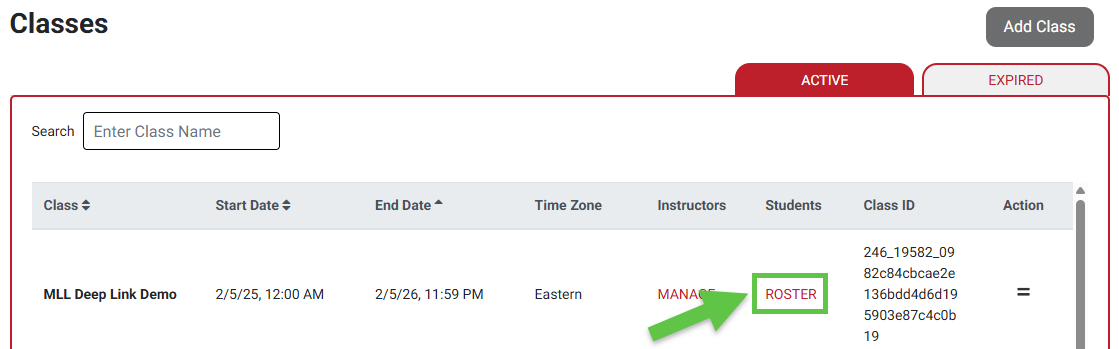
Click "MANAGE" (1) if you have a co-instructor who needs access to your MLL class. For more information on adding co-instructors to your MLL class, consult our "Adding Co-Instructors" article.
Clicking "ROSTER" (2) will bring you to your MLL class' student roster, so you can confirm all your students have enrolled.
To get a look at MLL from the student-side and work through assignments as if you were a student, click "Preview Student View" (3).

Clicking the cog button on the right side of each class listing will open a dropdown menu with two options: “Clone” and “Delete.”
In future semesters, you may utilize the "Clone" feature to copy your MLL class, though simply copying your MLL here will not integrate the copy with a new LMS course. For more information on copying integrated MLL classes, please consult our "Copying Classes" article.
Even after your class has concluded, please don't delete integrated MLL classes, because doing so can cause technical errors for your LMS course and later cloned MLL classes.

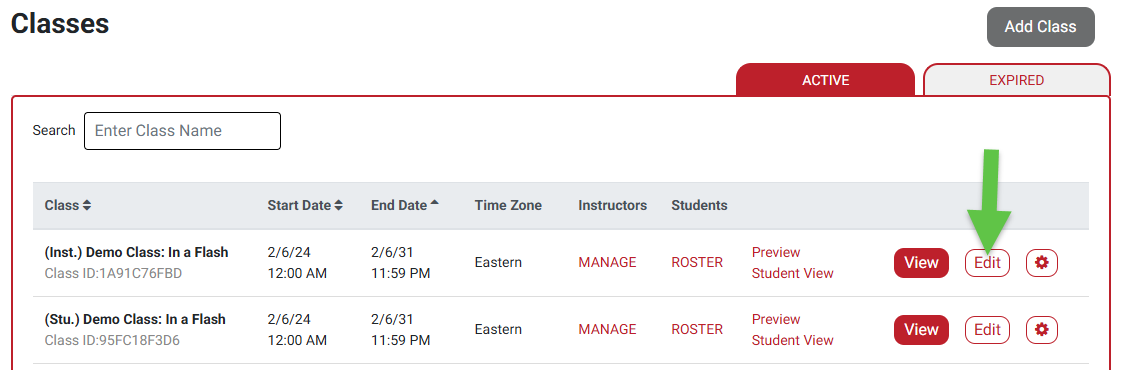
To view a class' Dashboard, click its "View” button. From a class' Dashboard, you'll be able to navigate to the class' Gradebook and other resources.
Click an "Edit" button to access your Medical Language Lab Class Set-up, so you can progress toward finalizing your MLL class' settings.
5. Finalize your MLL Class Set-up
On the Class Setup page, you will see a menu with six steps of adjustable course settings. If you're editing an MLL class that was set up for you by an admin, some of these steps will have already been configured for you.
The first step, "Create Class" will largely be a step wherein you confirm the macroscopic details of your MLL class, such as class name, the duration of the class via its Start and End Dates, and your time zone. We recommend giving your integrated MLL class the same name as the LMS course it's paired with, to increase student recognition.
If you encounter a setting on the "Create Class" step, or any other step of the Class Setup, that you need to change and are unable to do so, please contact us via [email protected] so we can assist you.
On the right margin of your "Create Class" step, you'll see a link to load your Implementation Guide, which will give you more insights on how to implement MLL assignments within your syllabus.
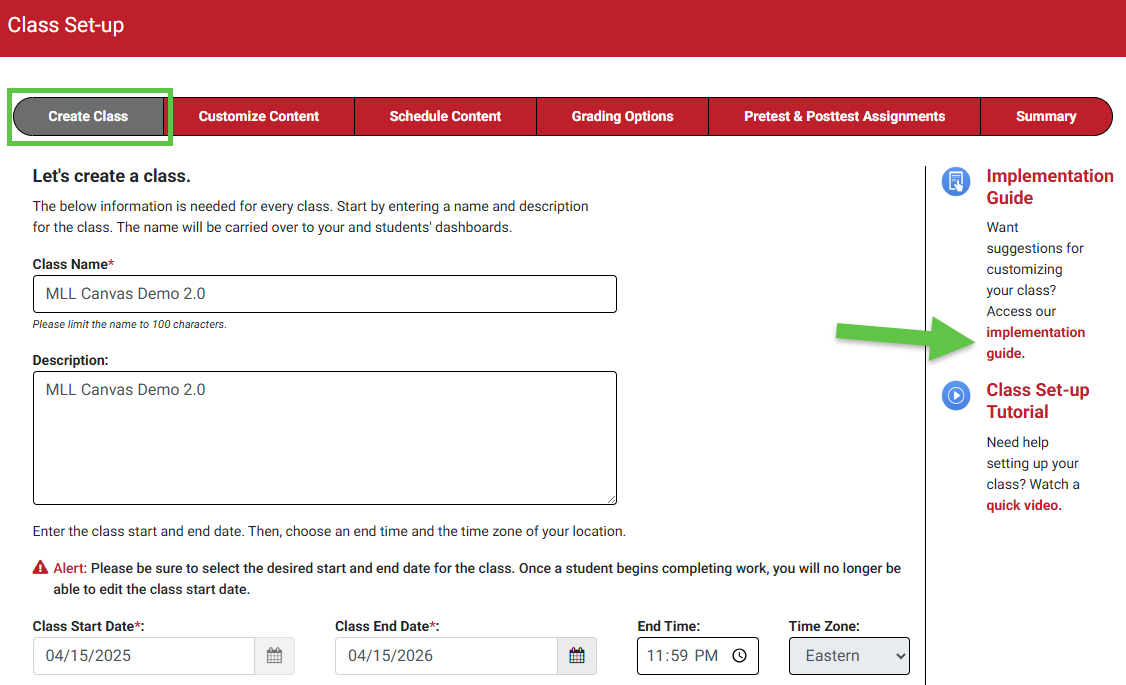
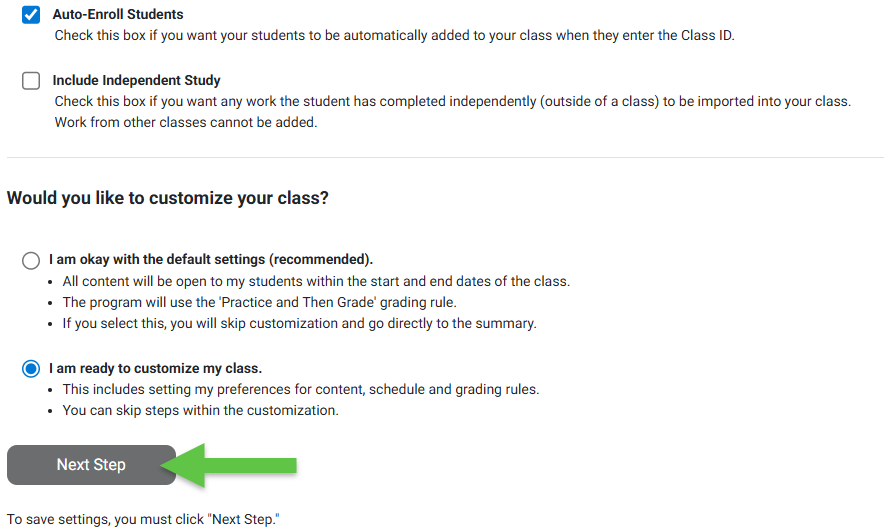
At the bottom of the "Create Class" step, please leave the "Auto-Enroll Students" checkbox checked, so your students will be enrolled when they launch an MLL class link inserted into your LMS course.
Additionally, please choose the "I am ready to customize my class." option, so you can progress through each possible step of your MLL Class Set-up.
Clicking the "Next Step" button saves whatever changes you made on a step of the Class Setup, in addition to progressing to the next step of the Setup.
On the "Customize Content" step, you'll see a list of all the MLL assignments inserted into your LMS course. This is where you can finalize the types of content and the number of exercises available to your students within each assignment module.
Please verify the topics turned ON here match the topics you'll cover in your syllabus. If you will not cover a topic listed on this step, please turn it OFF, so your students will only see MLL assignment modules that align with what they expect to cover in-class.

You can preview or turn off content in MLL assignments down to the exercise level.
Click its "Details" button (1) to open the full contents of an MLL assignment. Then, click the down caret (2) for an activity type within an opened assignment to see the exercises it has available.
Before students begin working in your MLL class, please make sure you or an admin have finalized which exercises your students will be responsible for completing. To learn more about the different types of exercises within MLL assignment modules, please consult our student "Assignment Types" article.
![]()
When you are finished making changes, select “Next Step” to move on.

The "Schedule Content" step of your MLL Class Set-up is where you'll finalize due dates for your MLL assignments. If you want students to be penalized for late work in your course, you will need to enter assignment due dates on this page to match the due dates in your syllabus or LMS.
Select “Set Dates,” and then click “Next Step” to see a list of assignments available in your course.

For each assignment, you will see a Start Date and an End Date. Most instructors forgo setting Start Dates, giving students have the opportunity to work ahead and/or preview the content in upcoming topics.
For each End Date, select the deadline that aligns with your intended due date for that assignment. The student will still be able to access the assignment after the End Date, but any new work submitted will be flagged as late and given a pending grade of “0” which you can override at your discretion. For more information on late work, see the “MLL Gradebook Features” section of our Instructor "Grading" article.

When you are finished selecting your due dates, click “Next Step” to save your changed due dates and move on.

On the "Grading Options" step of your MLL Class Set-up, you can choose Grading Rules for the different activity types within your MLL assignments.
Grading rules should remain at the default settings for most MLL classes. You do not need to make any changes on this page, but we recommend familiarizing yourself with these grading rules and informing your students of your selections in the first week of class.
Information about alternative grading rules can be found on the right-hand side of the page. For more information on grading in MLL, please consult our "Grading" article for instructors.
Click the dropdown menu to the right of an activity type to choose its Grading Rule. You won't be able to select Grading Rules for all activity types. For example, Generation exercises (if included with your textbook) always have to be manually graded, and Review exercises are always graded on first attempt. Please note that Grading Rules also cannot be updated once students have enrolled and begun working in the course.

When you are finished making changes, select “Next Step” to move on.
If you wish to add a Pre-Test and/or Post-Test to your MLL class, you'll be able to finalize the settings for those assignments on the "Pretest & Posttest Assignments" step of your MLL Class Set-up.
For a Pre-Test, you'll be able to set a due-date, then choose if you want to randomize the questions in your Pre-Test and/or generate a study plan for students in regards to their performance on their Pre-Test.
You need only set a due-date for a Post-Test, if you choose to assign one. Many instructors use a Post-Test as a review for their class' final exam, because it's not designed to be a final exam itself.

You won't be able to choose the exact questions that make up a Pre-Test and/or Post-Test, but you'll be able to toggle off/on the topics those assignments will draw questions from.

When you are finished making changes and/or setting due dates, select “Next Step” to move on.
The "Summary" step of your MLL Class Set-up gives you a chance to review the settings choices you've made.
Though it instructs you to at the top of the "Summary" step, you won't need to share your Class ID with your students. Because your MLL class is integrated within your LMS course, your students will automatically enroll in your MLL class by launching MLL class links via your LMS course.

6. Check student performance
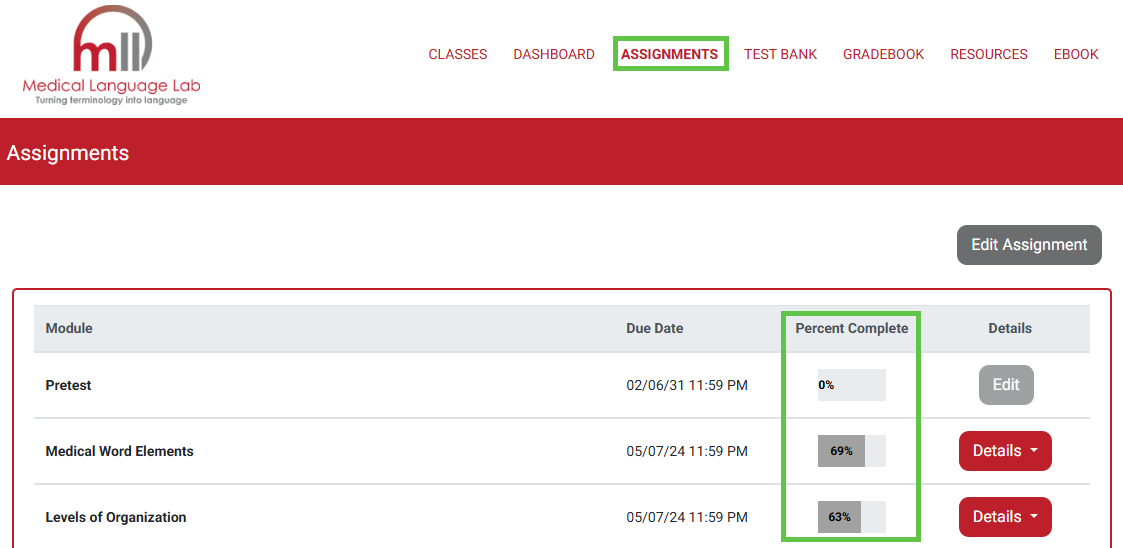
As students complete MLL assignments, their scores and completion rates will be viewable on your Assignments and Gradebook pages.
To see what percentage of your students have completed your respective MLL assignment modules, navigate to your Assignments page and view the Percent Complete bar for an assignment module.
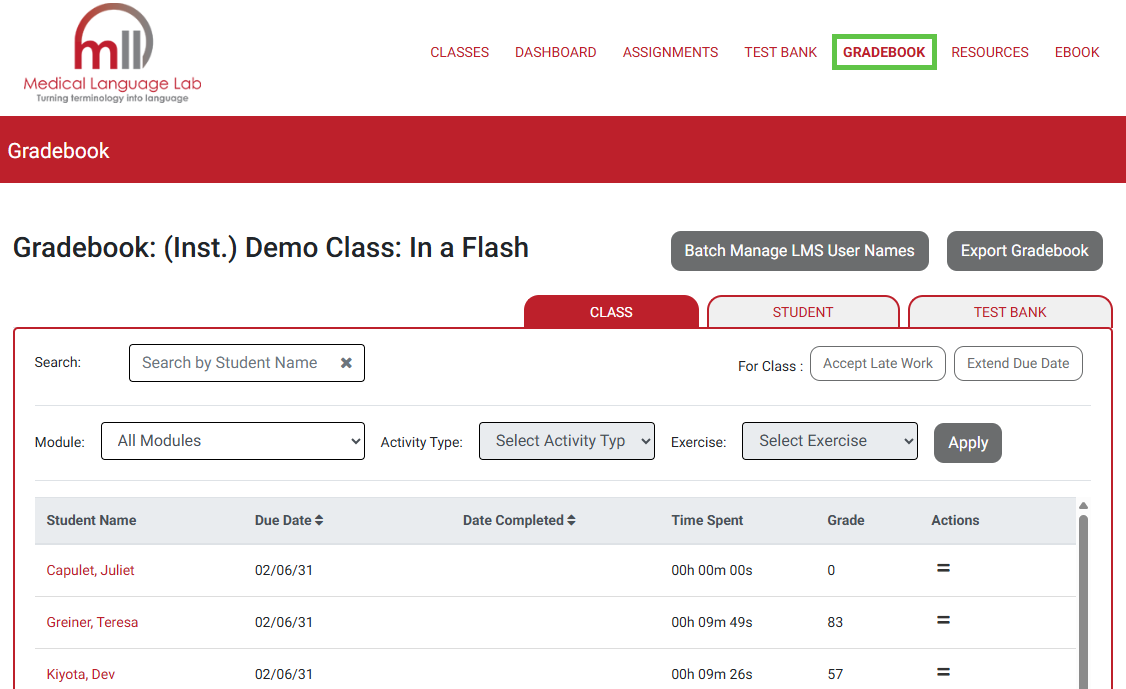
To check how your students are being scored for credit, and to accept late work or extend due dates, navigate to your MLL class' Gradebook page. If you need more information on how to use your MLL Gradebook, please consult the "Grading" and "MLL Gradebook Features" sections of our "Grading" article for instructors.
7. Access your Instructor Resources
After navigating to your MLL class, click "Resources" in the top-right navigation bar to access your Instructor Resources.
Your students won't be able to access the Instructor Resources that come with your textbook. And, you can edit whatever you find in your Instructor Resources however you see fit.

You can find full PowerPoint Presentations in the "Classroom & Lecture Planning Resources" dropdown menu of your Instructor Resources.
Also within your "Classroom & Lecture Planning Resources" dropdown menu, you can find an Instructor's Guide with insights on using MLL content in your class.

In the "Testing Resource" dropdown menu of your Instructor Resources, click the "Test Questions" dropdown menu to find documents with premade test questions for each chapter in your textbook.
Check with your admin to confirm whether the test banks seen here have already been added to your LMS course.

Alternatively, you can access the Instructor Resources for your textbook by logging into FADavis.com directly. For more information on how to access your Instructor Resources without launching your MLL class, please consult our "Instructor Resources" article.
8. Access your eBook
After navigating to your MLL class, click the "eBook" link in your top-right navigation bar.

F.A. Davis eBooks are hosted by a separate service called "VitalSource." When first opening an F.A. Davis eBook, you may be prompted to create or log into a VitalSource account.
When creating a VitalSource account, enter the same email you use to log into your LMS.

You won't be able to view exercises that students have completed in their eBooks, and their performance on those eBook exercises won't report to your MLL Gradebook.
9. Distribute the student Quick-Start Guide
If your admin hasn't already, please link the student "Quick-start Guide" article to be seen early in your LMS course content or in your syllabus. The student Quick-start Guide is designed to be an asynchronous orientation of all students need to know to launch and complete assignments within MLL, as well as how they can best utilize additional resources offered by MLL.
Students should enroll in your integrated MLL class by launching an MLL class link via your LMS course. You can direct your students to log into FADavis.com and navigate manually to Medical Language Lab, so they can then enroll themselves in your integrated MLL class using the Class ID you provide them, but enrolling students that way will add unnecessary steps to the student enrollment process.
After enrolling in your integrated MLL class, students have the option to log into FADavis.com and navigate to your MLL class manually, but we recommend they continue accessing your integrated MLL class via launching your inserted class links.
To confirm all your students are within your integrated MLL class, click the "Roster" link for the appropriate class on your MLL Classes page. Please confirm your MLL class roster a few days after your class start date, to ensure all your students have enrolled correctly.
If a student’s grades do not appear in your MLL Gradebook, they may be completing work independently and/or under an email account that is not enrolled in your course. You can check this by asking the student to confirm which email account they are using to access MLL. If the student has completed work under a different email, you can direct them to contact Customer Care via [email protected] for assistance merging their two accounts.
For more information on why a student might not be on your MLL class roster, please consult our "Enrollment Issues" support article.
10. Need more help?
If you have consulted the information/resources above and are still unable to access your MLL content, please contact us via [email protected]. Include your name, LMS login email address, and the name of your institution in your email to us, so our team can contact and further assist you.

