

*This guide is intended for instructors using LMS course shells that have been prepared by an admin, or by instructors who have already inserted Davis Edge assignment links themselves. If an admin has not inserted Edge assignment links into your LMS course shell, or if you haven't been provided a copy of an LMS course shell with inserted Edge assignments, please contact [email protected] for further assistance.
1. Before you begin
Do not log into the Davis Edge website and create an Edge class manually, because doing so will create an Edge class that will not integrate with your LMS gradebook.
Your integrated Davis Edge class will be created through your LMS. To begin, log into your Learning Management System (Blackboard, Canvas, Moodle, or D2L/Brightspace) and access your course.
2. Locate a Davis Edge assignment
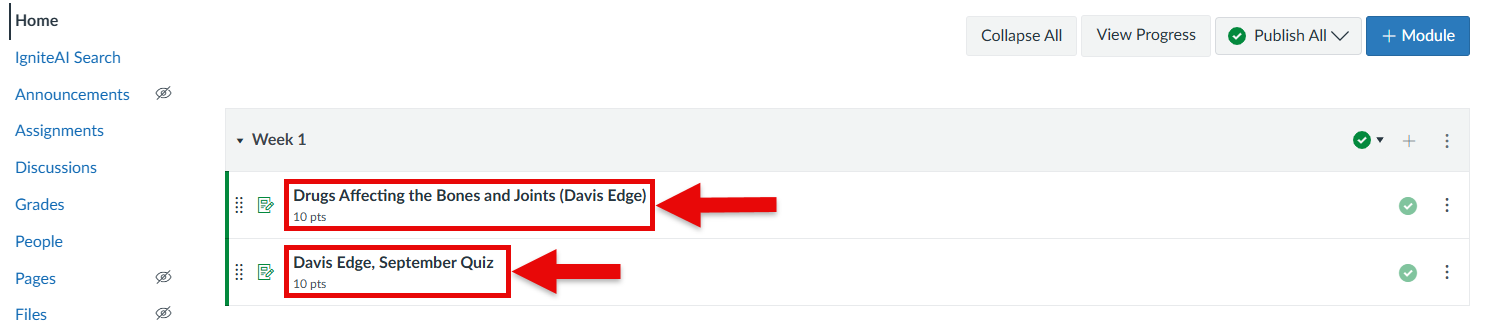
Once logged into your LMS course, locate a link to Davis Edge content.
The locations and titles of Edge assignment links will vary depending on how your admin has designed your course. Look for "Davis Edge," or assignment names like "Quiz 1” and "Drugs Affecting the Bones and Joints." Ask your admin for help if you're unable to find your Edge assignments.
Though the example below is of an Edge assignment within a Canvas course, your Edge assignments will appear similarly in all Learning Management Systems:
3. Launch an Edge assignment
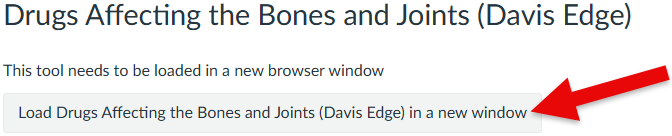
Click the link in your LMS course to launch an Edge assignment. Depending on your LMS, the Edge assignment may load automatically in a new browser window, or you may be taken to a launch page with a button to load the assignment.
If you are taken to an Edge assignment launch page, you may see an assignment description entered by an admin. If you don't see an assignment description, you can add one later on the assignment's setting page in your LMS. Click the button that reads "Load (assignment name) in a new window," so your assignment will launch in a new tab.
If you click an Edge assignment link and it fails to launch, it's possible your web browser settings blocked the assignment's launch page. Check your browser settings to make sure pop-ups are permitted.
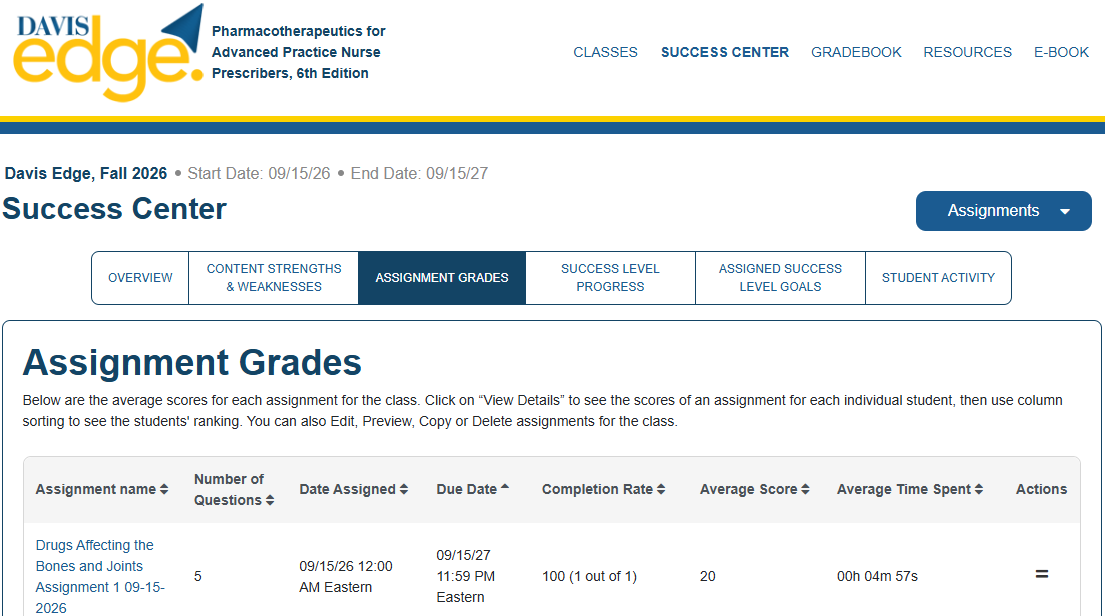
After launching an Edge assignment, you'll be taken to the "Assignment Grades" tab of your Success Center, with only the launched assignment listed.
If Davis Edge loads successfully, that means you have successfully activated and launched your integrated Davis Edge course. Your students will now be able to use the links in your LMS to automatically enroll in this Edge course and access their assigned coursework, which will be recorded in your LMS gradebook.
Please stress to your students that they must always access Edge assignments via the links in your LMS course, for their grades to record correctly.
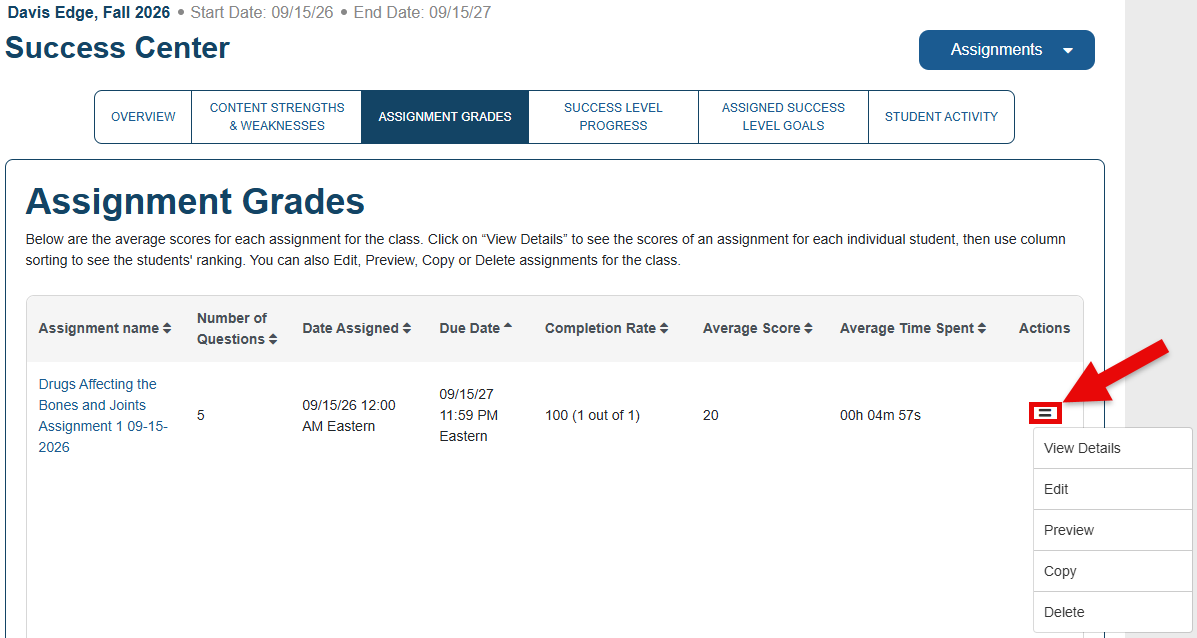
When viewing a launched Edge assignment, you can click its "Actions" icon for further options.
"Preview" will allow you to work through your Edge assignment as if you were a student. "View Details" will show you student performance data for the assignment at-hand.
Please do not "Copy" or "Delete" an Edge assignment without first consulting your admin and/or the FAD Integration team.
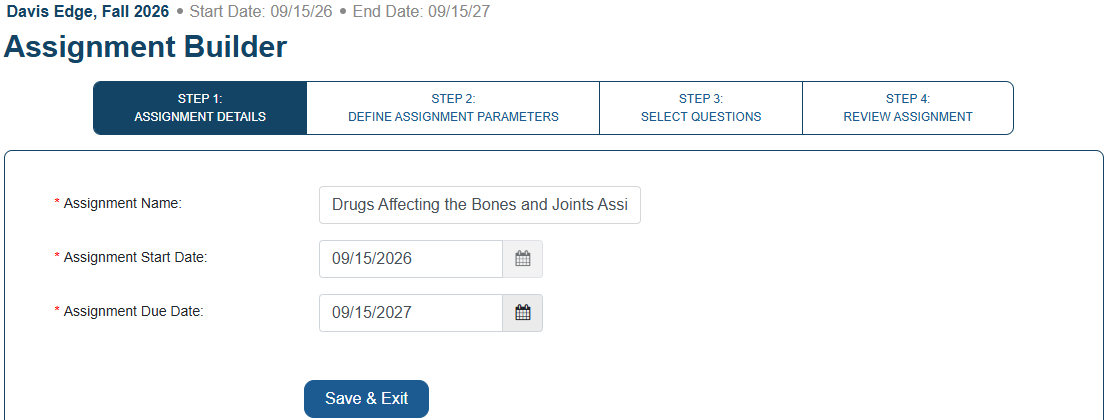
If you click "Edit" within an Edge assignment's Actions menu, you'll enter the Assignment Builder for it, wherein you'll be able to change aspects of your Edge assignment. For example, if you Edit an Edge assignment before any of your students have launched it, you'll be able to change the exact questions within the said Edge assignment.
Unless otherwise directed by a member of the FA Davis Integration team, please only change the due dates, assignment titles, or point values within the LMS assignment post settings for your integrated Advantage assignments. Changing further LMS assignment post settings may cause your integrated Advantage assignments to malfunction.
4. Navigate to your Davis Edge Class Set-up
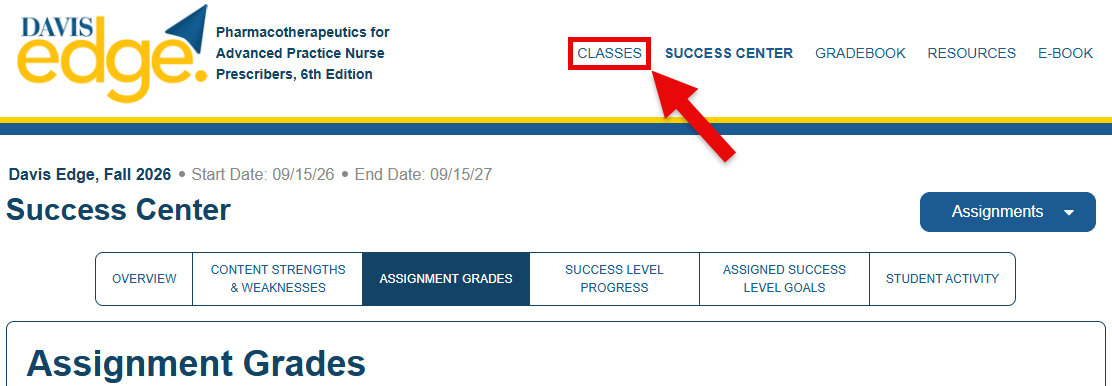
After launching an Edge assignment, you'll be able to finalized your Edge class' settings. Navigate to your Edge Classes page by clicking "Classes" in the top-right navigation bar.
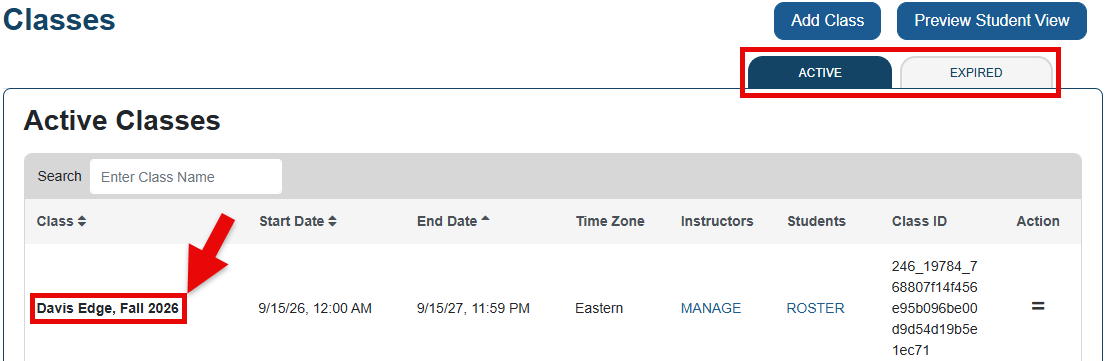
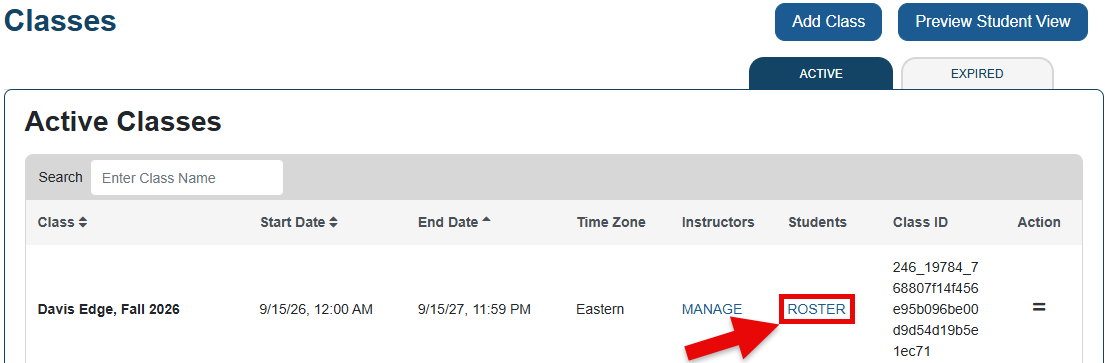
Your Edge Classes page collects your current and expired Edge classes. After a successful launch, an Edge class with the same name as your LMS course will appear under your list of Active Classes.
Do not click the "Add Class" button seen on your Classes, because doing so will create a non-integrated Edge class.
Due to the nature of your LMS integration, clicking "Preview Student View" won't give you an accurate preview of what your student's Edge experience will look like. If you want to preview student assignment content, please consult our Student Edge articles.
Click "MANAGE" (1) if you have a co-instructor who needs access to your Edge class. For more information on adding co-instructors to your Edge class, consult our "Adding Co-Instructors" article.
Clicking "ROSTER" (2) will bring you to your Edge class' student roster, so you can confirm all your students have enrolled.

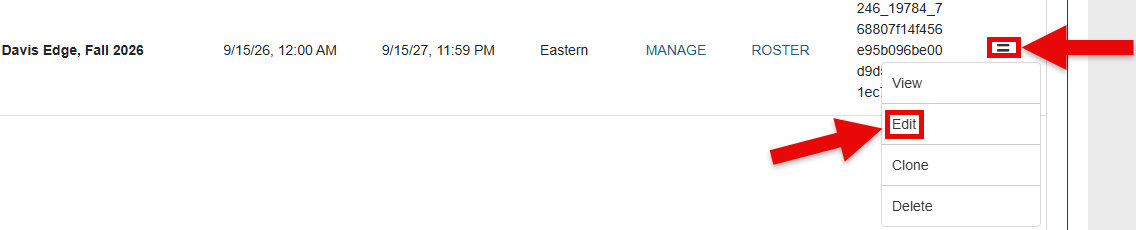
Click the "Action" button to the right of your Edge class to open a dropdown menu.
Thanks to your LMS integration, you can disregard the “Clone,” and “Delete” options within your Action dropdown menu. If you want to teach a copy of one of your Edge classes, please with your admin, the FAD Integration team, and our "Copying Courses" article for more information. Furthermore, please don't delete integrated Davis Edge classes, as this can result in technical errors.
To view a class' Success Center, click its "View” button. From a class' Success Center, you'll be able to navigate to the class' Gradebook and other resources.
Click an "Edit" button to access your Davis Edge Class Set-up, so you can progress toward finalizing your Edge class' settings.
5. Finalize your Edge Class Set-up
On the Class Set-up page, you have a few details to confirm, some of which have already been pre-configured for you by your integration.
Your "Class Name" was automatically set to match the name of the LMS course paired with your Edge class, but you can change your Class Name if desired.
The description beneath your Class Name is optional to fill.
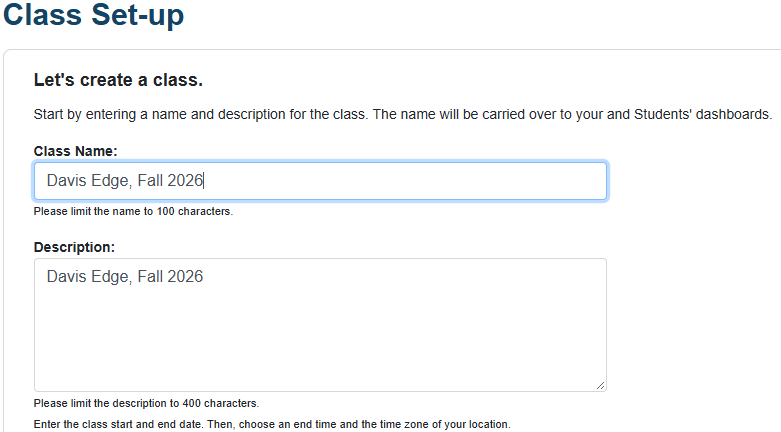
You may notice that the default class Start Date and class End Date are open longer than your actual course dates. You do not have to change these settings, as your students’ access to the class content will be determined by their access to your LMS course.
Please be advised that the End Time you select here will apply to all your Edge assignments, and cannot be changed once your class begins.

Leave the "Auto-Enroll Students" settings checked.
Though it instructs you to do so at the bottom of your Class Set-up, you won't need to share your Class ID with your students. Because your Edge class is integrated within your LMS course, your students will automatically enroll in your Edge class by launching Edge assignments via your LMS course.

If you encounter a setting on your Class Set-up that you are unable to change, please contact us via [email protected] so we can assist you.
Scroll to the bottom of your Class Set-up and click the "Save" button to confirm your choices.
6. Check student performance
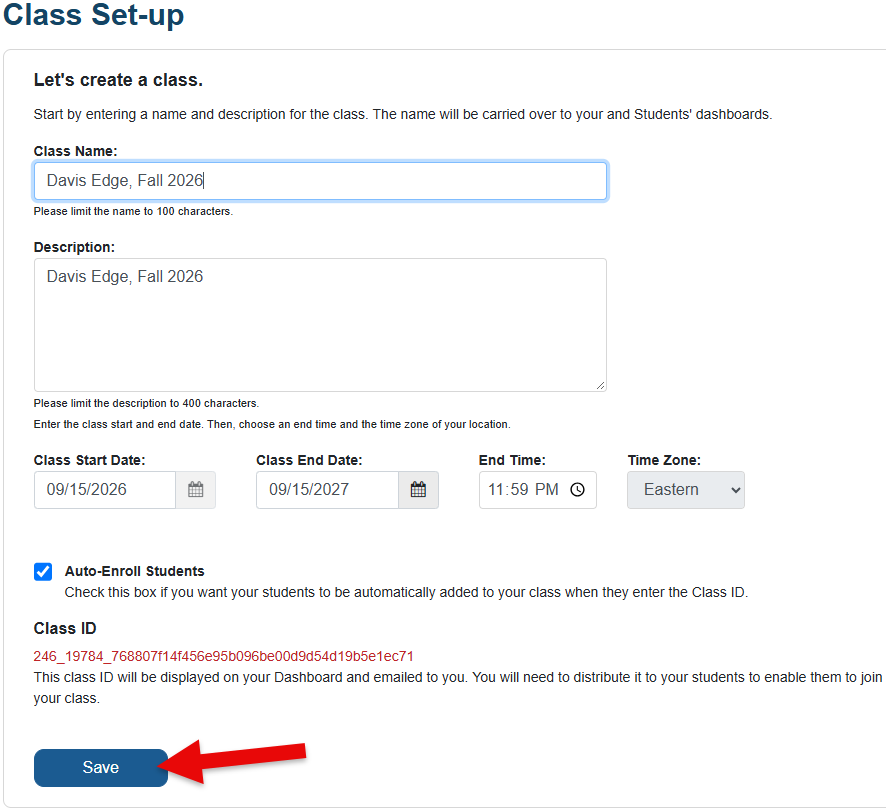
As students complete the Davis Edge assignments in your LMS course, their grades for those assignments will report back to your LMS gradebook. Please stress to your students they must always access Edge assignments via your LMS course, for their grades to report back correctly.
If a student reports a grading discrepancy to you, please begin investigating that discrepancy by checking your Edge Gradebook against your LMS gradebook.

If you set due dates within Davis Edge itself, students who haven't opened an Edge assignment by its due date will be given a zero for said assignment. Furthermore, if students complete Edge assignments after their due dates have passed, their scores for said Edge assignments will be overridden with zeroes.
You will need to accept or reject late work within Davis Edge itself, then update the effected students' Edge assignment grades in your LMS gradebook.
Any time you see a zero for an Edge assignment in your LMS gradebook, you should consult your Edge Gradebook to confirm whether you need to accept late work.

To check how your students are being scored for credit, and to accept late work or extend due dates, navigate to your Edge class' Gradebook page and consult the "Grading" and "Edge Gradebook Features" sections of our "Grading" article for instructors.
7. Access your eBook
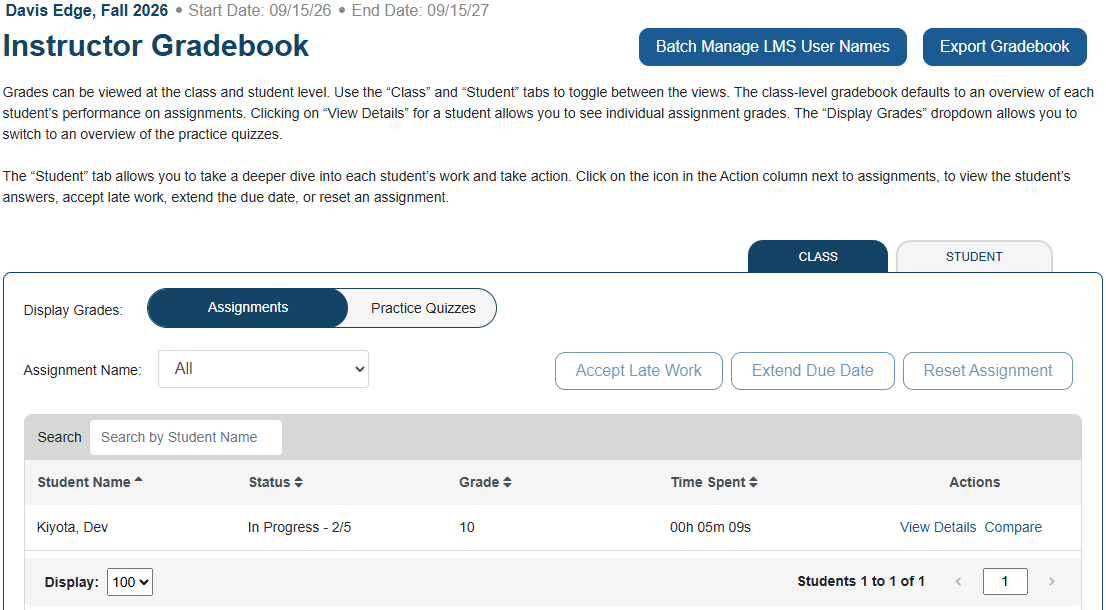
You and your students will be able to access the eBook associated with your integrated Edge class.
After launching an Edge assignment, click the "eBook" link in your top-right navigation bar.

F.A. Davis eBooks are hosted by a separate service called "VitalSource." When first opening an F.A. Davis eBook, you may be prompted to create or log into a VitalSource account.
When creating a VitalSource account, enter the same email you use to log into your LMS.

You won't be able to view exercises that students have completed in their eBooks, and their performance on those eBook exercises won't report to your Gradebook.
8. Access your Instructor Resources
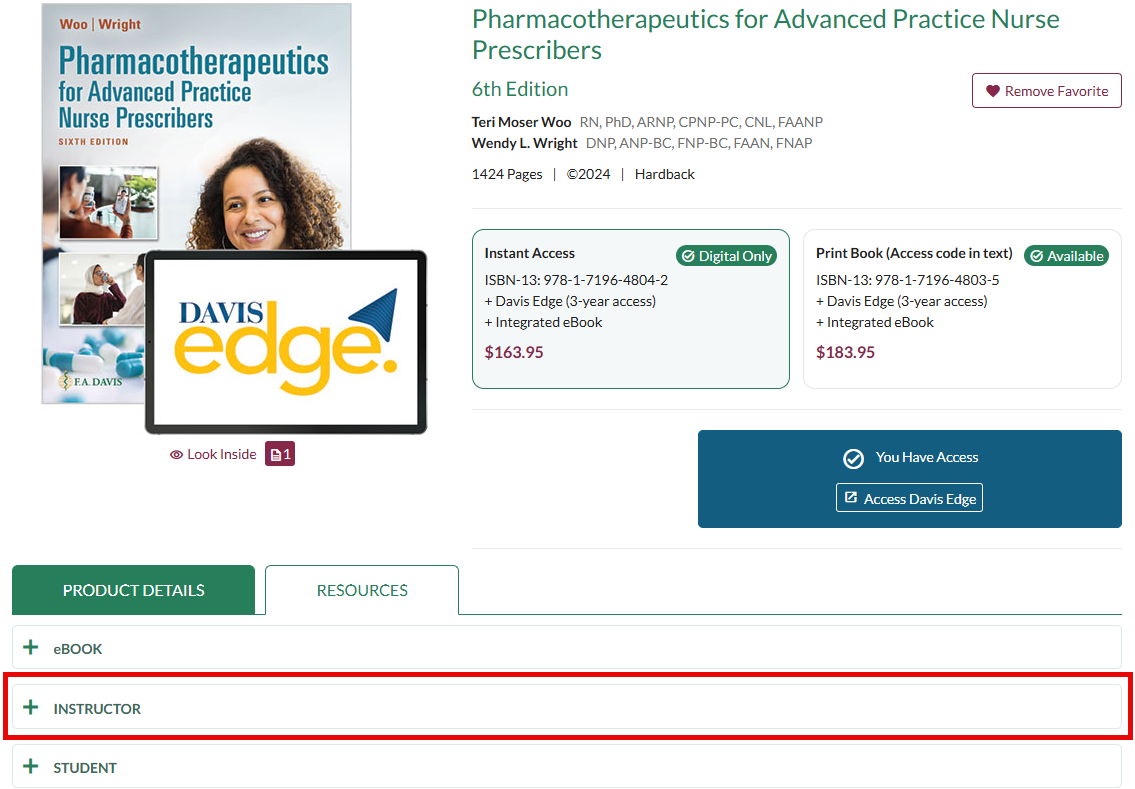
For guidance on accessing your Instructor Resources, which include pre-made PowerPoint Presentations and test banks, please consult our "Instructor Resources" article.
9. Distribute the student Quick-Start Guide
If your admin hasn't already, please link the Student "Quick-start Guide" article to be seen early in your LMS course content or in your syllabus. The student Quick-start Guide is designed to be an asynchronous orientation of all students need to know to launch and complete assignments within Davis Edge, as well as how to utilize additional resources offered by Edge.
Students should only access your Edge assignments via your LMS course, and they'll be automatically enrolled into your integrated Edge class when they first launch one of the Edge assignments inserted into your LMS course.
To confirm all your students are within your integrated Edge class, click the "Roster" button seen on your Edge Classes page or consult the names listed in your Edge Gradebook. Please confirm your Edge class roster a few days after your class start date, to ensure all your students have enrolled correctly.
If a student’s grades do not appear in your Edge Gradebook and/or do not write back to your LMS gradebook, they may be completing work independently or under an email account that is not enrolled in your course. You can check this by asking the student to confirm which email account they are using to access Davis Edge. If the student has completed work under an email other than their institutional email (i.e. the email address they use to access your LMS course), you can direct them to contact Customer Care via [email protected] for assistance merging their two accounts.
For more information on why a student might not be on your Edge class roster, consult our "Enrollment Issues" article.
10. Need more help?
If you have consulted the information/resources above and are still unable to access your Edge content, you can contact us via [email protected]. Include your name, LMS login email address, and the name of your institution in your email to us, so our team can contact and further assist you.

